On static sites
For the past few days I have been working almost exclusively on the site. Starting a new project is always exciting, and so I’m trying to take advantage of that initial momentum as much as possible before it inevitably dies off.
Aside from the excitement for design and content of the blog, however, I also really enjoy using the technology that is powering it. That being a static site generator, specifically Pelican. So I wanted to share a bit about my setup and how it’s working out so far.
First of all, an overview. What a static site generator (or SSG) like Pelican does, is essentially very simple: It takes a directory full of content and a directory of templates and combines the two to create a site as just a flat directory of static files. That can then be deployed on any kind of host you want, from Amazon S3 to a raspberry pi, to a static-site-focused service like Netlify (what this site is using). The final site needs no database or server-side rendering, it’s just served as-is to the user. Good old static HTML/CSS/JS.
While this might sound somewhat limiting, it’s actually more than enough for most websites — and definitely for a blog. Anything you might have wanted to do using, for example, Wordpress you can probably do either at build time using the SSG or using client-side JavaScript: Inserting common features between pages (e.g. a sidebar), minifying CSS, transpiling to JS, are all easy-to-trivial. Anything more dynamic that you might think you need a backend for, you can probably achieve using either an external service (e.g. Disqus for the comments and reactions below), an AWS Lambda function (which Netlify manages for you), or just plain old JavaScript.
Pelican
So, on to the specifics of my setup. As I said, I’m using a python-based SSG
called Pelican. Pelican uses Jinja 2 for its templates
which you should be familiar with if you’ve ever used Flask. Building is handled
through the pelican command and a python-based config file (pelicanconf.py).
Pelican also provides a utility called pelican-quickstart to generate the
initial skeleton for the project.
With that said, the file structure for this blog looks like this:
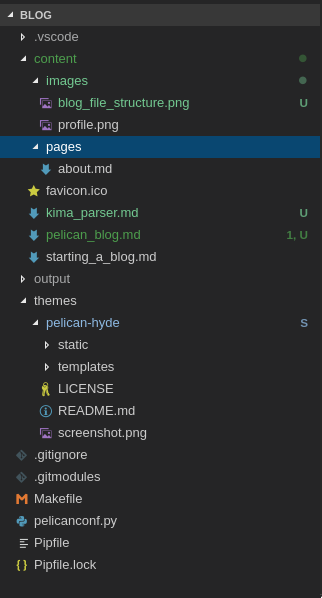
content/contains all of the actual, well, content of the site. That includes articles and images, as well as anything else I might want to upload to the site. If, say, I want to upload a PDF CV at some point, it goes in here.themes/pelican-hyde/contains the theme of the site. That includes templates, CSS, and any global JS I might want to include (e.g. Google analytics scripts). More on this later.pelicanconf.pyis the config file for pelican. It contains site settings like my contact details, the name of the RSS feed, and much more. There is no actual dynamic python in there, it’s simply a bunch of variable declarations that are imported by pelican.Pipfilecontains the blog’s dependencies to be managed by pipenv.- The
Makefilecontains targets for the common tasks that are run during development (build, clean, deploy, etc.).
The theme I’m using is based on pelican-hyde. I’m maintaining a personal fork of it here, — that is what you’re seeing right now. VSCode makes it very simple to manage both, both the base repo and the submodule show up in the version control tab and provides the same tools for both the root repo and the submodule.
Netlify
The second most important component in this blog would have to be Netlify. At first it appears like a simple hosting provider with some extra bells and whistles. But it’s so much more than that. It collects CI, Hosting, DNS, HTTPS certificates under one service; and that is just the things I’m using for my simple blog! It also provides authentication, forms, management for AWS lambda functions, and so much more.
All I had to do on netlify for hosting was login to my gitlab account, choose
the blog repo, and provide the command to build the site. Netlify then builds
the site whenever I push to gitlab. It even detected the dependencies from my
Pipfile automatically! Then, I could transfer my domain to Netlify and it
generated a let’s encrypt certificate with a single click.
I honestly can’t praise Netlify enough. While it might present issues at bigger scales or edge cases, for my humble blog, it is godsend.
Conclusion
After the little effort I’ve spent setting this up, I can say it was a very successful project. The blog looks as good as I could hope for with the effort I’ve put in and making changes couldn’t be easier. While this is a very small project, I’m sure that static site generators are a much more powerful tool than a lot of people might think. Give one a try for your next project. It might surprise you.